There’s a lot of curiosity surrounding what is involved in a solar power installation. A lot of DIYers make it sound relatively easy, but is it as easy as they say? The fact is that while these DIYers may provide tutorials on how to set up a solar panel, they don’t tell you a whole lot about the other factors surrounding a solar installation that are equally as important as manual labor. In this article, we’re going to attempt to fill in the gaps by giving you a simplistic but comprehensive 4-step process that illustrates how solar power systems are installed.
- The Paperwork
Before you can install a solar power system, a lot of paperwork has to be completed. Various states offer solar incentives and rebates, and since the majority of people who resort to solar power are looking to save money, it goes without saying that this is a priority that needs to be taken care of. Also, you may have to apply for building and utility permits that prove your setup is up to code and meets all necessary regulations. After you have completed all of the received paperwork and received the permits you need to start the installation; it’s time to start ordering your equipment. - Equipment Ordering
This is where the real fun begins. Before you start the installation process, you get to purchase your equipment. It’s always exciting having the opportunity to buy products tailored to the needs of your home. There are an array of options out there, and if you’re doing it all yourself, you have free reign to buy exactly what you want. If you’re using a contractor, they will be able to help you make the best choices based on what they know from their experience. Either way, the ball gets rolling, and you’re that much closer to seeing your solar power system in action. - The Installation
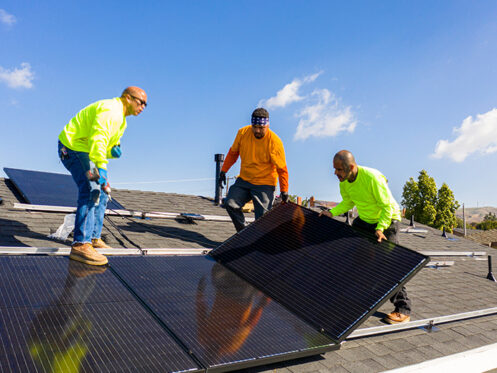
Once your equipment has arrived, it’s time to get to work. A solar panel installation usually begins with electrical work first. An inverter is placed next to your main electrical panel, and the wiring is configured. Afterward, mounts for the solar panels are secured to your roof (or the ground), and the solar panels are fastened to them. The panels are then connected to the inverter via the wiring, and the inverter is finally connected to your electrical panel. At this point, you’ll want to power those bad boys up and see how they operate but wait! There is just one last step left. - The Inspection
A representative from your city will then need to come and inspect all of the work that has been done before you can connect your solar panels to the electric grid. Everything has to be reviewed to make sure that it is done correctly. If your system does not pass the inspection, you may have to correct some issues before you can get approval. If it does pass the inspection, then you’re good to go! You can now start enjoying the benefits of your newly installed solar power system.
Final Words
There’s a lot more to a solar power system installation than just connecting some wires here and there. You have to make sure everything you do meets specific standards; otherwise, you may face fines. You’ll also need to order equipment that suits your home and overall goals for your system and either install it yourself or hire a contractor to do it for you. And finally, you have to have the whole shebang inspected. It’s a lengthy process, but as people say, the best things in life are worth waiting for.